

Knowing how to change a tire is one of those skills most people never practice until the moment they actually need it. That’s fine. It’s a skill you can learn in one go, and this guide walks you through every step clearly — including safety checks most articles gloss over, what to do after the change, and when to skip the whole thing and just call for help.
If you’ve never learned how to change a tire before, don’t worry — you need about 20–30 minutes, the right tools (which should already be in your car), and a safe place to work. Let’s get through this.
What You Need Before You Start
Pop your trunk now and confirm you have everything. Missing one of these makes the job harder or impossible.
Spare tire — Check the pressure when you’re not in an emergency. Most spares lose air just sitting there. [internal link placeholder: how to check tire pressure] Car jack — Should be in the trunk, often tucked under a panel. Scissor jacks come with most cars; hydraulic floor jacks are easier to use but less common. Lug wrench — Usually an L-shape or cross-shape bar. Fits one specific lug nut size. Owner’s manual — Tells you exactly where the jack points are on your specific car. This matters more than people think. Wheel chocks — Blocks placed behind the tires to prevent rolling. A large rock or a spare piece of wood works if you don’t have them. Flashlight — Your phone’s flashlight works, but a hands-free headlamp is better if you have one. Gloves — Tires and wheels are dirty. More importantly, you’ll want grip.
One thing to know about compact spares: If your car came with a small donut-style spare instead of a full-size tire, it has hard limits — typically no more than 50 mph and 50–70 miles. It’s a get-to-the-shop solution, not a replacement tire. [internal link placeholder: spare tire types explained]
Safety Checks Before You Lift the Car
This section matters more than the actual tire swap. Rushing past it is how people get hurt.
Get as far off the road as possible. A flat, stable, paved surface is what you want — a parking lot or a wide paved shoulder. Grass, gravel, and slopes are all bad surfaces for a jack. If you can’t get to a safe spot, stay in the car with your seatbelt on and call roadside assistance.
Turn on your hazard lights immediately — before you even get out of the car. This alerts other drivers before anything else happens.
Once stopped: set the parking brake. If your car is a manual transmission, leave it in first gear (or reverse on an uphill). These together prevent the car from rolling when the jack lifts one corner.
Place wheel chocks behind the tires diagonal to the flat. If you’re changing the front-left tire, chock behind the rear-right. If you don’t have chocks, wedge a large rock or piece of wood snugly against the tire tread.
Always position yourself on the side of the car away from traffic. If a vehicle drifts onto the shoulder, you want the car between you and it.
If you have a reflective triangle or flares, place them 50–100 feet behind your car to give oncoming drivers more warning.
Before jacking anything: open your owner’s manual and find the jack point diagram. Every car has reinforced spots along the frame designed to take the jack’s weight without damaging the body. Using the wrong spot can bend rocker panels, crack the body, or collapse the jack. This step is not optional.
Step 1 — Loosen the Lug Nuts First
Do this before the car leaves the ground. Once a wheel is airborne, it spins freely, and you won’t be able to generate enough force to break the nuts loose.
If your wheel has a hubcap or wheel cover, pry it off first. Most pop off with the flat end of your lug wrench.
Place the lug wrench on one nut and turn it counterclockwise. If it’s stuck — and it often is — stand on the wrench arm and let your body weight do the work rather than using just your arms. A short, sharp downward stomp often breaks loose a stubborn nut faster than sustained pressure.
Break each nut loose about half a turn. Stop there. Do not remove them yet. You’re just cracking the seal so they’ll unthread easily once the car is lifted.
Some cars have a wheel lock nut — a specially shaped lug nut that requires an adapter key to remove. This key is usually a small socket in a velvet pouch in your glove compartment. If you can’t locate it and none of your sockets fit one lug nut, stop and call for help.
Step 2 — Raise the Car
Place the jack under the correct jack point (from your owner’s manual). Position it squarely — a crooked jack is an unstable jack.
Raise the car until the flat tire has roughly 6 inches of clearance from the ground. You need enough room to slide the spare on without binding.
Do not go under the car while it’s supported only by the jack. Not for any reason. A jack can slip, sink into soft asphalt on a hot day, or simply fail. The risk isn’t worth whatever you think you need to retrieve under there.
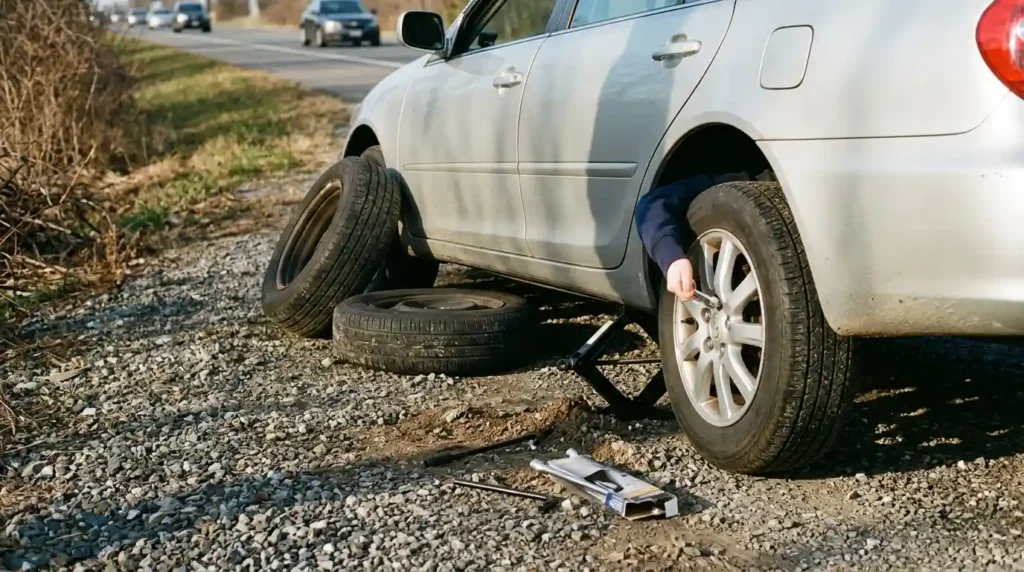
Step 3 — Remove the Flat Tire
Unthread the lug nuts the rest of the way by hand and set them somewhere they won’t roll. Your hubcap placed face-up on the ground next to you works well as a small tray for them.
Pull the flat tire straight toward you and set it aside. Before you do anything else, slide the flat tire horizontally under the car near the jack. This sounds odd, but if the jack slips while you’re mounting the spare, the car drops onto the tire instead of the ground — giving you a bit of a buffer and protecting the brake components.
Step 4 — Mount the Spare Tire
Lift the spare into place and align the holes with the wheel studs. This can be awkward because spare tires are heavy — use your knee to help hold it up if needed.
Thread the lug nuts on by hand, starting at the top, then moving to the bottom, then left, then right — a cross or star pattern. Do not work around the circle in order. The star pattern pulls the wheel onto the hub evenly; going in a circle risks seating it at a slight angle, which can cause vibration or, worse, loosening while driving.
Tighten each nut as firmly as you can by hand, but no more yet. Final tightening happens after the car is back on the ground, because the tire needs to be against the road surface to resist turning when you apply torque.
Step 5 — Lower the Car and Tighten
Lower the jack slowly until the tire contacts the ground and bears just a little weight — not the full weight of the car yet. At this halfway point, use the lug wrench to tighten each nut in the star pattern as firmly as you can. Put your body into it.
Now lower the car completely and remove the jack.
Do a final pass over each lug nut in the star pattern to make sure nothing loosened during the lowering. Give each one a firm check — if any feel loose, tighten them again.
Pull the flat tire from under the car, put it in the trunk along with your jack and wrench, and you’re done with the roadside part.
After the Tire Change — Do Not Skip This
Most tire-change guides end at Step 5. That’s a mistake. The next 30 minutes matter.
Stop at a gas station as soon as you can and check the spare’s pressure. The gauge is usually free, and air costs next to nothing. A spare sitting in your trunk for two years may be significantly underinflated without you knowing.
If your spare is a compact donut: stay under 50 mph. Don’t take it on the highway at full speed, don’t use it for your commute all week, and don’t forget it’s there. These tires are rated for roughly 50–70 miles under normal conditions. [internal link placeholder: what to do after a blowout]
Take the flat tire to a shop the same day if at all possible. A nail or screw in the center tread can often be patched for $15–$30, which is much cheaper than buying a new tire. Sidewall punctures or tears cannot be repaired — those tires need to be replaced. Let the shop look at it before you throw it away.
If you feel vibration while driving after you change a tire, pull over. Re-check each lug nut before continuing. A wheel that wasn’t seated evenly or nuts that weren’t fully tightened can both cause this. Most shops will re-torque your lug nuts with a calibrated torque wrench for free if you ask — worth doing if you used a manual wrench on the side of the road.
Common Mistakes to Avoid
Loosening lug nuts after lifting the car — The wheel spins and you can’t generate torque. Always loosen first. Wrong jack point — Using the wrong spot can damage the car’s body or drop the jack. Check the manual. Skipping wheel chocks — A car rolling off a jack is genuinely dangerous. Block the diagonal tire. Not checking spare pressure before a road trip — Most people find out the spare is flat when they actually need it. Check it twice a year alongside your regular tires. Tightening lug nuts in a circle — Causes uneven seating. Always use the star pattern. Skipping the final torque check — Tightening while the wheel is airborne doesn’t work properly. Always do a final tighten after the car is on the ground. Driving on a donut at highway speed — These tires are not rated for it and can fail. Keep it under 50 mph.
When You Should Not Attempt It
Some situations make a roadside tire change genuinely unsafe or impossible. Know when to stop.
If you’re on a highway with no real shoulder — not a narrow strip of gravel, but no shoulder at all — don’t attempt it. Getting hit by a passing vehicle is a real risk. Turn on your hazards, call roadside assistance, and wait inside the car with your seatbelt on.
Same goes for: working in the dark without adequate light, a soft or sloped surface where the jack won’t sit stably, missing tools, a spare that’s already flat, or a rim that looks damaged from a blowout. A bent or cracked rim can’t support a mounted tire safely.
Roadside assistance exists exactly for these moments. AAA, your insurance’s roadside coverage, or manufacturer services like Hyundai Assurance and BMW Roadside are all options. Calling for help is the right call — not a last resort.
Conclusion
Knowing how to change a tire is a practical skill every driver should have — not just for emergencies, but for the confidence it brings on every road trip or late-night drive. This guide has walked you through every step, from loosening the lug nuts before lifting the car to doing a final torque check once it’s back on the ground. The safety steps aren’t optional, the star pattern matters, and checking your spare pressure twice a year can save you from being stranded with two flat tires instead of one. If the situation is genuinely unsafe — no shoulder, no light, no tools — call for help without hesitation. But when conditions allow, understanding how to change a tire means you’re never completely at the mercy of a flat. Take five minutes this week to check your spare. You’ll thank yourself later.